


The last post took look at a Spring Batch project template to get off the ground quickly. In this series we're going to take it a step further and use the starter to build out a batch job. We won't focus too much here on the implementation of the framework itself (docs do a good job of that), but rather practical descriptions and use-cases to quickly enable yourself to build robust batch jobs for enterprise apps.
Prerequisites
You should be proficient with Java for this overview. Also, knowledge of Spring framework (IoC, beans, context, etc) is very beneficial.
Here we'll do a practical overview of some of the primary components that you'll work with in Spring Batch. Depending on your use case, you may want to dig around the official docs for additional info.
Goals
- You want to understand how Spring Batch works to create custom batch jobs for real-world use cases
In this set of posts we will build a modest, multi-threaded batch pipeline. It will read a directory of files (XML data dumps from Stack Exchange), perform some processing, and write to a relational DB (MySQL). Here is the link to the full source:
Intro to batch processing
TL;DR: all batch processing is the act of reading a lot of data, doing some sort of processing, and writing the result somewhere.
If you're someone looking for a refresher in the strategies and principles of batch processing, I would recommend a skim of Spring's introduction here. I found this portion of their docs super helpful. It does a great job providing background on batch processing and translating that to Spring Batch's architecture.
Understanding Spring Batch... enough to get started
Like most-things-Spring, the framework comes with a lot built for you out of the box. You can get up and running pretty quickly. Adding @EnableBatchProcessing to your spring app gives you everything you need to code with for free (many beans!). Personal experience has taught me it's best to have a decent grasp on Spring's implementation of whatever you're using. We'll use the following diagram to discuss the way Spring implements batch and how to use some of the common interfaces.
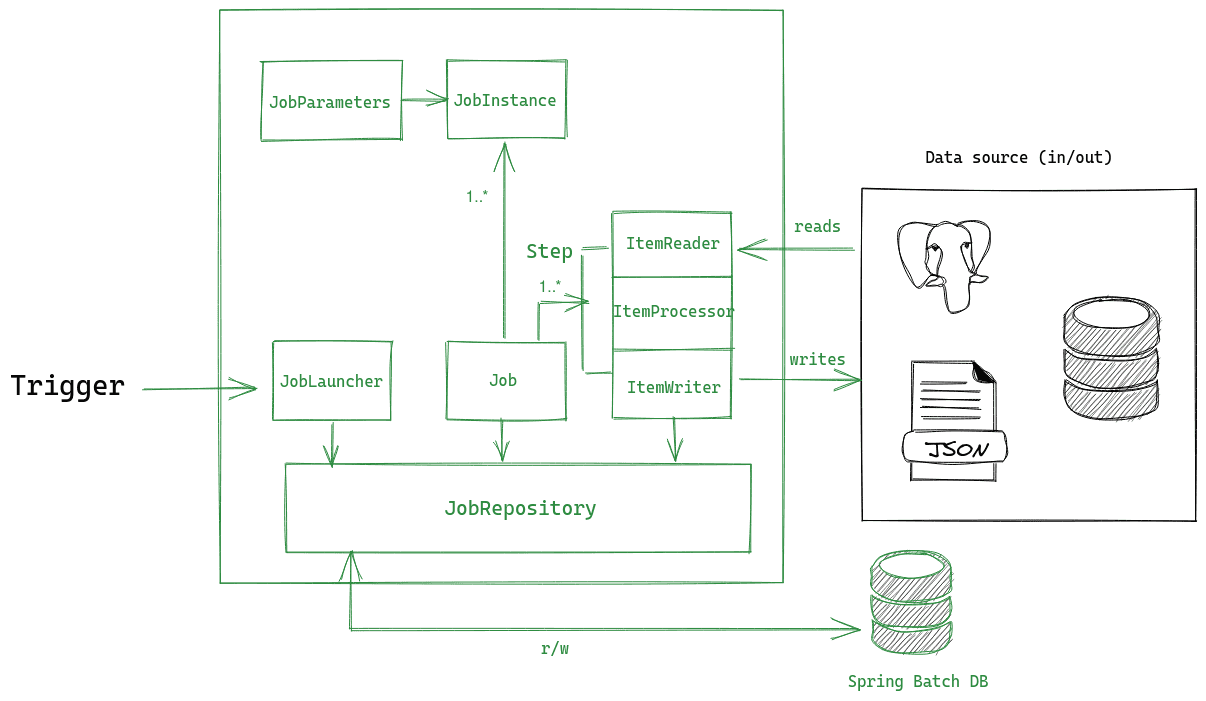
The image depicts the general process flow of a Spring Batch job. In summary, an external trigger interacts with the JobLauncher, which is responsible for kicking off a Job. The framework records metadata and progress to a datastore via the JobRepository. This metadata is used for things like reporting and restart/retry. As a developer, your job is to define the steps that perform their own reads, processing, and writes from N inputs and outputs.
Above isn't a comprehensive architecture diagram (there's some additional classes & interfaces exposed by the framework), but it should give you a baseline of what you're working with.
The Job interface
A Job is the object Spring gives you to configure and declare a batch pipeline.
To get an intro to scripting a pipeline with Spring Batch, we can start by inspecting a Job object. It comes with some configuration options you can tune like restartability and step order. To define your job, you'll want to use the provided JobBuilderFactory. Doing so will give you access to some handy builder syntax to create simple job definitions. We can define paths of execution by chaining multiple Steps or Flows to describe our batch logic:
@Bean
public Job coolBatchJob() {
    return jobBuilderFactory
            .get("coolBatchJob")
            .flow(stepA())
            .end()
            .build();
}
In the above snippet, we're defining a job called coolBatchJob and kicking it off with a single step. That step is coming from a method stepA() that returns an object of type Step.
Many batch pipelines consist of multiple steps with triggers and even conditional logic. What if we only wanted to run a step if certain conditions are met? The builder allows us to define this with ease. For example, the following demonstrates how the builder is used to detail conditional logic. The pipeline runs a "happy path" of stepA followed by a sequence of steps in flow1() and flow2(); however, we've also defined an alternate step to run if stepA returns an ending status of NOTIFY:
@Bean
public Job coolBatchJob() {
    return jobBuilderFactory
            .get("coolBatchJob")
            .start(stepA())
            .on("NOTIFY")
                .to(notification())
            .from(stepA())
            .on("COMPLETED")
                .to(flow1())
                .next(flow2())
            .end()
            .build();
}
The Step interface
A Step is one level lower than a Job. It represents an independent unit of work. Spring doesn't impose too many restrictions on how a step must be implemented. A step could be as simple as reading from a file and writing to a table in a DB. A more complicated step might read a file with different entities, apply some business or filtering logic, and write the aggregate somewhere. Just like a job has a JobExecution object holding metadata for each run, each step is associated with a StepExecution recording metadata such as readCount, errorCount, and execution time.
You'll want to be familiar with the process of defining and fine tuning a step. Within the framework there are two models for steps to choose from, a chunk-oriented step or a TaskletStep. These two approaches are outlined below.
Chunky steps?
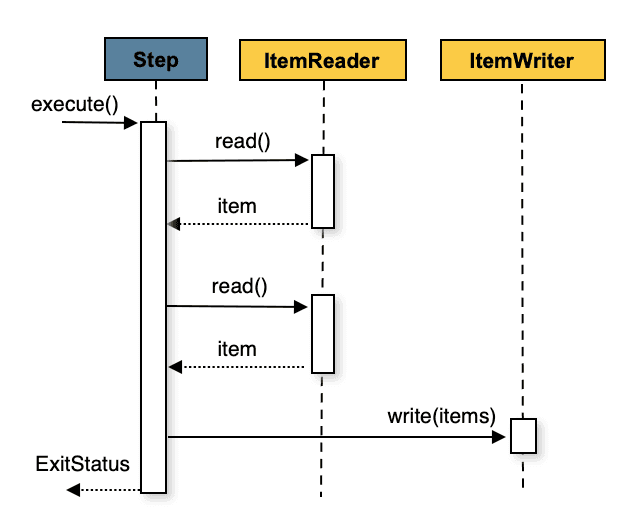
Understanding the chunk-oriented processing style Spring Batch uses is essential for efficient jobs. In a nutshell, this means that many individual reads occur until the number reads is equal to the 'commit interval' (chunksize). At this point, the entire set of items (chunk) is written to the configured output. If you're familiar with database operations, this is effectively reading and writing within a transaction boundary. Because it is operationally expensive to start/stop a transaction, it is preferable to process as many items as possible within each transaction. This sequence diagram and pseudocode from Spring's docs illustrate this process:
List items = new Arraylist();
for(int i = 0; i < commitInterval; i++){
    Object item = itemReader.read();
    if (item != null) {
        items.add(item);
    }
}

List processedItems = new Arraylist();
for(Object item: items){
    Object processedItem = itemProcessor.process(item);
    if (processedItem != null) {
        processedItems.add(processedItem);
    }
}

itemWriter.write(processedItems);
The real power & legwork of the framework lies within this type of chunk-based approach. The type of data being processed and resources of your system should factor into the chunk size of each step. This is why the number of read/writes in each step is highly configurable.
To create a step using this approach, you specify an ItemReader that is able to ingest the input data and an ItemWriter that writes to a desired output. Step definitions could optionally use an ItemProcessor that specifies a function to run on each item. To demonstrate how you might go about constructing a step, let's use the following scenario:
A Person can be defined by a first name and last name. A step in a job needs to read thousands of people from a CSV and write to a relational database. The names must be written to the DB in all capital letters. An excerpt of the file to read looks like this:
Jill,Doe
Joe,Doe
Justin,Doe
Jane,Doe
The class
Personcan be modeled this way:
public class Person {
    private String lastName;
    private String firstName;

    public Person(String firstName, String lastName) {
        this.firstName = firstName;
        this.lastName = lastName;
    }

    @Override
    public String toString() {
        return "firstName: " + firstName + ", lastName: " + lastName;
    }
}
In this scenario we have to read from a CSV, do some capitalization, and insert rows to a SQL table. Just like with jobs, there's a builder available for configuring a step. Here we define a Step with name personStep and chunk size of 100, meaning 100 names will be read then committed in aggregate.
@Bean
public Step step1() {
    return stepBuilderFactory
            .get("personStep")
            .<Person, Person>chunk(100)
            .reader(readers.readerCsv())
            .processor(processor())
            .writer(writers.csvItemWriter())
            .build();
}
We also pass to the builder an ItemReader and ItemWriter that direct the read/write behavior of the step (these will be explained in a bit more detail later). Spring and the community already provide many different types of readers and writers so writing a full-fledged batch pipeline could take very little code. Readers and writers are very simple interfaces which makes building a custom one as easy as defining a single method.
We won't look too deeply into the process of defining ItemReaders and ItemWriters here because the syntax of each is largely specific to the implementation. For completeness, here's the reader and writer definitions for this scenario:
/** @return FlatFileItemReader Configured reader
* uses framework's FlatFileItemReader
*/
@Bean
public FlatFileItemReader<Person> readerCsv() {
    FlatFileItemReader<Person> reader = new FlatFileItemReader<Person>();
    reader.setResource(new ClassPathResource(csvFile));
    reader.setLineMapper(
            new DefaultLineMapper<Person>() {
                {
                    setLineTokenizer(
                            new DelimitedLineTokenizer() {
                                {
                                    setNames(new String[] {"firstName", "lastName"});
                                }
                            });
                    setFieldSetMapper(
                            new BeanWrapperFieldSetMapper<Person>() {
                                {
                                    setTargetType(Person.class);
                                }
                            });
                }
            });
    return reader;
}

/*
Uses framework's JdbcBatchItemWriter
*/
@Bean
public JdbcBatchItemWriter<Person> jdbcWriter() {
    JdbcBatchItemWriter<Person> writer = new JdbcBatchItemWriter<Person>();
    writer.setItemSqlParameterSourceProvider(new BeanPropertyItemSqlParameterSourceProvider<Person>());
    writer.setSql("INSERT INTO people (first, last) VALUES (:first, :last)");
    writer.setDataSource(dsOut);

    return writer;
}
The StepBuilder also exposes a number of options for fault tolerance, skipping, multi-threading, retry logic, and others.
Tasklet steps
A TaskletStep is a bit simpler than a chunk-oriented step. It is best used in parts of a pipeline that don't fit into the chunk-based mold such as calling a stored procedure or executing some DDL. The syntax for defining a TaskletStep is much simpler:
@Bean
public Step step1() {
    return this.stepBuilderFactory.get("step1")
    			.tasklet(setupTasklet())
    			.build();
}
You simply define a class that implements the Tasklet interface. This interface has a single method that needs to be defined, execute(...), that is called repeatedly until it returns RepeatStatus.FINISHED. A common pattern in the early/late steps of a job is to run some DDL to clear a schema before writing. This could be done by in a Tasklet:
public class SetupTasklet implements Tasklet {

    private final JdbcTemplate jdbcTemplate;

    private final String DROP_DDL = "DROP TABLE IF EXISTS data_in;";

    @Autowired
    public SetupTasklet(JdbcTemplate jdbcTemplate) {
        this.jdbcTemplate = jdbcTemplate;
    }

    public RepeatStatus execute(StepContribution contribution, ChunkContext context) throws Exception {
        jdbcTemplate.execute(DROP_DDL);
        return RepeatStatus.FINISHED;
    }

}
The ItemReader interface
The reader itself is super generic and is only responsible for reading a line of data and incrementing the cursor. It handles the input to a step. When all data is read, it should return null so the framework knows when the end has been reached. The reader is responsible for opening and closing connections and allocating resources needed to perform the reads.
public interface ItemReader<T> {

    T read() throws Exception, UnexpectedInputException, ParseException, NonTransientResourceException;

}
This simplicity allows for easy extensibility and reuse. Spring provides a number of readers for different datasources such as streams, SQL/NoSQL, flat files, and more that will fit the majority of use cases.
the ItemProcessor interface
Not all steps require processing or complex transformations of data. An ItemProcessor comes in handy when you need to perform some specific calculations, filtering, or apply business logic on the dataset. The processor interface definition is below:
public interface ItemProcessor<I, O> {

    O process(I item) throws Exception;
}
It operates on an input object of type I and and returns an object O. This allows for transformations if necessary. To illustrate how to define an ItemProcessor, let's return to the previous scenario of a CSV of names. In this scenario, we want to capitalize all the names. This is a perfect (simple) example of some business logic that could live in a processor!
public class PersonItemProcessor implements ItemProcessor<Person, Person> {

    private static final Logger log = LoggerFactory.getLogger(PersonItemProcessor.class);

    @Override
    public Person process(final Person person) throws Exception {
        final String firstName = person.getFirstName().toUpperCase();
        final String lastName = person.getLastName().toUpperCase();

        final Person transformedPerson = new Person(firstName, lastName);

        log.info("Converting (" + person + ") into (" + transformedPerson + ")");

        return transformedPerson;
    }
}
The ItemWriter interface
Another relatively simple interface, the ItemWriter is responsible for the write-back operations. The method of write could be anything such as writing to MongoDB or a file.
public interface ItemWriter<T> {

    void write(List<? extends T> items) throws Exception;

}
Summary
We've touched on the basics of configuring jobs and the inner workings of a step in Spring Batch which should enable you to start writing some batch jobs. All-things-spring have a boatload of configuration options and tools to speed up implementation and reduce boilerplate code, so I encourage you to take advantage of the ecosystem. The official docs present some additional useful tools like listeners and parallel processing options that may improve the quality your job. In the next post we will take this basis to develop and run a full pipeline E2E.